Ember attack is one of the most important ways a house can ignite during a bushfire, and the best protection is usually the kind residents do not have to think about at the last minute. This part of the Integrated Residential Bushfire Protection System focuses on making the house permanently ember resistant, so vulnerable gaps, junctions and concealed spaces are reduced or protected long before fire season arrives.
Why ember resistance deserves a permanent design approach
When people think about bushfire protection, they often picture flames at the fence line or a sprinkler running on the roof. Those measures can be useful, but ember attack is different. Embers can travel ahead of the main fire front, arrive during the fire front, and continue to threaten the property after the front has passed. A house may be exposed for a long period, and not every ember lands in a visible place.
That is why ember protection should be primarily passive and permanent. Residents should not be expected to run around the home in the final minutes before a fire, trying to tape over dozens of vents, cover openings or improvise a barrier system. If protection depends on a rushed manual response, it is easier to miss something, and missed gaps can become ignition points.
The better approach is to build ember resistance into the house wherever possible. In practical terms, that means eliminating unnecessary openings, permanently sealing gaps and penetrations, and protecting the openings that must remain with suitable non-combustible materials. This approach is more reliable, easier to maintain and usually more sensible than simply adding more last-minute protection devices.
For this reason, ember resistance should be treated as a core part of the house itself, not as an optional extra. It works alongside defendable space, building construction, water supply, roof sprinklers and the other layers in the wider residential bushfire system. It does not replace them, and it does not make a house fireproof. What it can do is reduce the number of easy ignition points that embers exploit.
Eliminate gaps first, then protect the openings that must remain
The preferred design principle is simple: eliminate unnecessary openings first. Only after that should you protect the openings that must remain. This matters because not every gap needs mesh. Some gaps should be permanently removed through better detailing, tighter construction or a different product choice.
This distinction is important for both new homes and retrofits. If a gap serves no useful purpose, there is no good reason to leave it exposed and then hope a mesh cover will be enough. A permanent seal or a better building detail is often the cleaner, stronger solution. Mesh and other ember-protection products are best reserved for the places where ventilation, drainage or service access must still occur.
Typical order of work
- Identify unnecessary gaps and remove them where practical.
- Seal penetrations and junctions that should not be open to ember entry.
- Protect functional openings with non-combustible mesh or another suitable bushfire-resistant product.
- Check that the protection remains effective after maintenance, repairs or building changes.
This approach avoids a common mistake: placing mesh over every gap as a default solution, even where the gap itself should not exist. A poorly planned mesh layer can collect debris, create maintenance problems or fail when exposed to heat if the wrong material is used. Good design starts with reducing vulnerability, not just covering it.
| Target | Preferred approach | What to avoid |
|---|---|---|
| Unnecessary opening | Permanently remove or seal it | Leaving it open and relying on temporary action |
| Required vent or drain path | Protect with suitable non-combustible mesh or equivalent product | Plastic mesh or heat-sensitive parts |
| Service penetration | Use a bushfire-suitable sealing system | General household sealant only if it cannot tolerate exposure |
In new construction, these choices can often be built in from the start. In older homes, the work may need to be staged. Even then, a step-by-step retrofit plan is usually better than leaving the house with obvious ember pathways because the perfect solution was not possible immediately.
New-build ember-resistant design: make the house hard to penetrate
New homes have the greatest opportunity to become ember resistant because vulnerable details can be designed out before the building is complete. This is where the biggest gains are often available at the lowest long-term effort. A well-designed new house can reduce the need for frequent manual preparation and limit the number of hidden gaps that later need to be chased down.
The main aim is to make the external envelope harder for embers to enter and harder for ignited debris to lodge in. That means paying attention to the roof, walls, eaves, services, openings and any junction where materials meet.
Build with fewer ember entry points
During design and construction, consider whether certain gaps, voids or ventilation paths are truly necessary. If they are not necessary, remove them. Where openings are necessary, detail them so they can be protected with appropriate non-combustible materials. This is often more effective than trying to make a large number of small weaknesses survive independently.
New-build design also allows better coordination between trades. Roofing, electrical, plumbing, ventilation and wall construction can all be planned together so the finished house has fewer awkward penetrations and fewer improvised sealing jobs. That coordination matters because many ember problems are not caused by one large fault, but by the accumulation of numerous small ones.
For new builds, a secondary barrier beneath the roof covering should be considered, such as suitable sarking or another appropriately rated system. This layer is not a substitute for sealing and detailing, but it can help reduce ember entry into the roof space and improve resistance where the roof covering is not completely impervious.
Because house designs and local product suitability can vary, builders and homeowners should check that any system selected is appropriate for the building and the expected bushfire exposure. A design that looks neat on paper still needs to perform when hot debris, wind and thermal stress arrive together.
Retrofit improvements for existing homes
Older homes often have the opposite problem to new homes. They may contain many small gaps, older building details, a mix of materials and changes made over time by different trades. That does not mean they cannot be improved. It does mean the work is usually more detailed and may need to be staged over several visits or seasons.
A sensible retrofit plan starts with the highest-risk openings and the easiest-to-fix defects. Roof gaps, roof penetrations, vents, underfloor openings and obvious junctions should be checked first. After that, the home can be reviewed for less obvious pathways, including wall penetrations, weepholes, service entries and areas where combustible structures attach to the building.
In many cases, retrofitting can be done without major demolition. The goal is not to rebuild the house from scratch. The goal is to reduce the number of places where embers can get in or lodge. Sometimes this means replacing a vulnerable component. Sometimes it means adding a suitable barrier. Sometimes it means removing an unnecessary opening entirely.
What homeowners can usually do first
- Walk around the house and identify open gaps, missing seals and visible ember entry points.
- Check the roof line, eaves, wall junctions and service penetrations.
- Look for places where debris collects easily.
- Ask whether each opening is actually needed.
- Plan professional repair for anything that is uncertain, hidden or difficult to reach.
For an existing house, a retrofit secondary barrier in the roof space may be practical in some cases, particularly during roofing work or major maintenance. Where practical, it should complement sealing and ember protection rather than replace them. If a roof cavity already has obvious entry points, the secondary barrier alone is not enough; the opening problem still needs attention.
Owners should also be realistic about age and condition. A house that has been modified several times may have more vulnerabilities than it first appears. Roof work, new vents, solar installations, air-conditioning upgrades and plumbing changes can all create openings that were not there originally. An ember-resistant retrofit plan should treat those changes as part of the house, not as separate minor details.
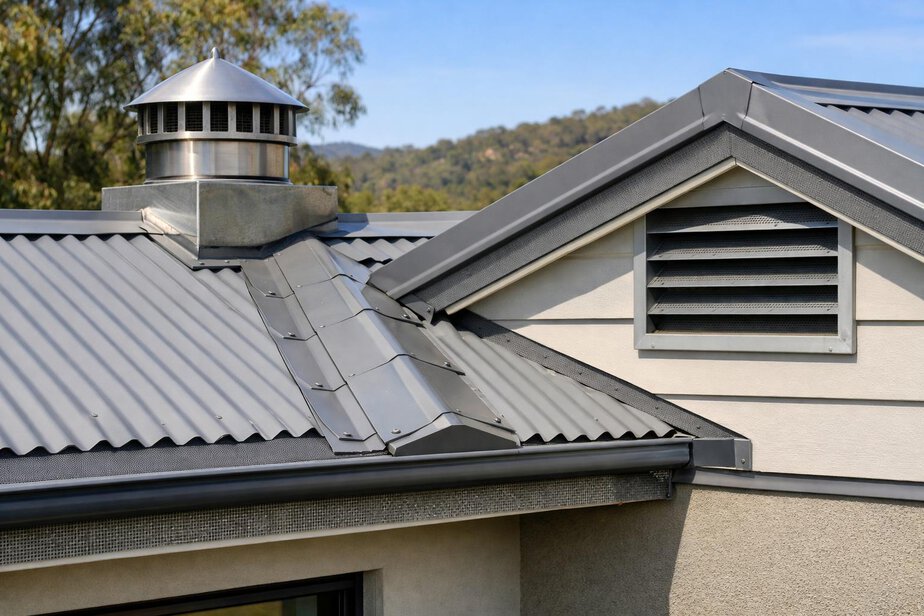
Roof-space protection: a major vulnerability that deserves special attention
The roof space is one of the most important areas in ember protection because once embers enter the cavity, ignition can occur in hidden places. These concealed spaces may contain timber framing, insulation, dust and accumulated debris, all of which can support ignition under the right conditions. A fire starting inside the roof cavity is especially dangerous because it may spread before anyone notices.
This is why roof-space entry points should be treated as a major vulnerability, not a minor detail. Even small openings around the roof covering, junctions or penetrations can become pathways for embers carried by wind. A house may appear closed from the ground while still having numerous points of entry overhead.
New construction
For new houses, consider suitable sarking or another appropriately rated secondary barrier beneath the roof covering. This can help reduce ember intrusion and provide an added layer of defence. It should be designed as part of the complete roof system, not as an afterthought.
That said, a secondary barrier does not mean sealing and detailing can be ignored. Embers should still be kept out as much as possible through careful construction, because every entry path that remains open is another opportunity for debris to accumulate.
Existing houses
For existing homes, retrofitting a secondary barrier may be practical where roof work is already being done, or where the roof design allows it. In some cases this may be easier than trying to solve every tiny gap individually. In others, the cost or complexity may mean it is better to prioritise sealing the worst openings first. The right choice depends on the house, the roof type and the building condition.
What matters is the principle: roof-space ember entry is not a secondary issue. It is a serious vulnerability that should be part of any serious bushfire upgrade plan. Even small weaknesses in the roof envelope can matter when wind-driven embers are present for an extended period.
Common vulnerabilities: where embers find a way in
Embers often exploit the same types of weaknesses again and again. The exact details vary from house to house, but the vulnerable areas are familiar. A practical ember-resistant home pays attention to these points systematically rather than relying on one product or one quick fix.
Roof gaps, ridge lines and roof junctions
Roof gaps can appear at ridges, edges, overlaps, flashings and intersections where different parts of the roof meet. These are prime areas for ember entry, especially if wind drives debris under edges or into small openings. Roof junctions should be checked carefully during design, installation and later maintenance.
Where possible, reduce the number of awkward joints and exposed gaps. Where openings must remain, protect them with suitable non-combustible materials that can tolerate the expected exposure. If a gap exists only because of poor workmanship or an avoidable design choice, the best answer is often to fix the detail rather than simply cover it.
Eaves and wall junctions
Eaves can create sheltered spaces where embers lodge and slowly ignite debris. Wall junctions can do the same, particularly where materials change or where there are small cracks and joints. These areas need close attention because they may not look dangerous until you inspect them from the ember’s point of view: a place where heat, debris and airflow can all combine.
Vents, weepholes and drainage openings
Some openings are needed for ventilation or drainage and cannot simply be sealed shut. These are the places where suitable metal ember mesh or another properly tested non-combustible bushfire-resistant product becomes useful. The point is not to block every opening indiscriminately. It is to allow the opening to keep doing its job while making it far harder for embers to pass through or lodge inside it.
Weepholes deserve special attention because they are small but common. If they are part of the wall system, they should be assessed carefully to make sure the required function remains while ember entry is reduced as much as practical.
Roof penetrations and service entries
Any penetration through the roof or walls is a potential weak point. That includes plumbing, electrical, air-conditioning, cable entries, antenna connections and other building services. The issue is not only the hole itself, but also the quality of the sealing around it. A neat penetration today may become a gap tomorrow if the wrong material is used or if the seal ages poorly.
Sealants and penetration systems should be suitable for the expected bushfire exposure. It is not enough to use a general-purpose product simply because it is easy to buy. The material must be appropriate for the job and for the conditions it may face.
Underfloor openings and low-level access
Where a house has an underfloor area, openings beneath the building can allow embers and debris to gather. These spaces may also contain stored materials or structural components that can be affected if a small ignition starts below the living area. Underfloor openings should be treated as part of the ember pathway analysis, not as an afterthought.
Roof valleys, gutters and other collection points
Roof valleys and gutters are not just maintenance features; they are ember collection areas if the design allows leaves, bark and embers to accumulate. A design that minimises such collection points is preferable to one that depends entirely on regular cleaning. Maintenance is still important, but good design reduces the burden on the resident and lowers the chance of a missed clean-out becoming a problem.
For practical purposes, every awkward ledge, hidden corner and sheltered junction should be asked the same question: can debris and embers collect here, and if so, can the design be improved?
Ember mesh and protection products: use the right material for the job
Metal ember mesh is often a common and sensible solution for openings that must remain for ventilation or drainage. It can help reduce ember entry while still allowing the building detail to function. However, mesh is not the answer to every gap, and not all mesh is suitable. The product must be selected for the actual application, not just for convenience.
Where other non-combustible bushfire-resistant products are suitable and properly tested for the intended use, they may also be appropriate. The key principle is not to rely on combustible or heat-sensitive materials where they may fail under bushfire exposure. That includes ordinary plastic mesh, soft plastics and general-purpose materials that were never meant to tolerate high heat or flying embers.
Good product selection principles
- Use non-combustible or specifically bushfire-suitable materials where protection is needed.
- Match the product to the exposure, location and required function.
- Do not assume a product that works in normal weather will survive ember attack.
- Check that the fixing method is also durable and secure.
- Remember that a mesh is only as effective as the opening, seal and frame behind it.
Another common issue is the use of unsuitable sealants around penetrations or joints. A sealant may look neat after installation but still be the wrong choice if it cannot tolerate heat or if it breaks down over time. Bushfire-suitable sealing systems should be chosen carefully, particularly where roof, wall or service penetrations may be exposed to significant heat and debris.
In short, ember protection works best when the entire system is bushfire aware: the opening, the seal, the mesh and the surrounding construction all need to make sense together. A weak link in any one of those parts can compromise the whole detail.
Design out ember traps instead of relying only on cleaning
It is tempting to think of ember attack as a cleaning problem. Keeping gutters clear and removing leaf litter certainly matters, but maintenance alone is not enough. A better house design reduces the places where debris and embers can collect in the first place. That is what is meant by designing out ember traps.
Ember traps commonly form in roof valleys, gutters, deck corners, wall junctions, steps, verandah junctions, around outdoor equipment and between structures. These are sheltered spaces where leaves, bark and small debris can sit unnoticed. If embers land there, ignition risk rises quickly.
Examples of ember traps to review
- Roof valleys that collect leaf litter.
- Gutters that are difficult to reach or clean.
- Deck corners where debris drifts and sits.
- Wall junctions with sheltered ledges.
- Steps and landings that trap leaves.
- Verandah junctions where debris gathers under cover.
- Spaces around outdoor equipment.
- Gaps between a house and nearby structures where embers can lodge.
Design improvements may include changing the shape of a junction, removing an unnecessary ledge, using more suitable materials, improving access for cleaning or separating structures that create a sheltered trap. The practical aim is to make it harder for combustible material to accumulate unnoticed.
This is particularly important because ember attack can continue for a long time. A house that is only safe when perfectly cleaned every time is more vulnerable than a house whose design already sheds debris and limits collection points.
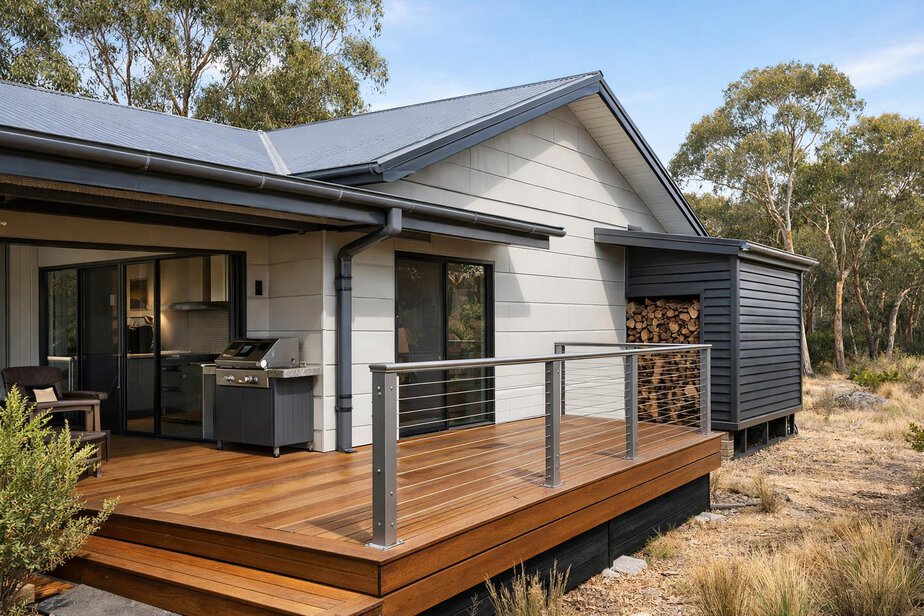
Combustible attachments can spread a small fire to the house
Timber fences, decks, pergolas and similar combustible attachments connected directly to the house deserve careful attention. They may seem separate from the main structure, but in a bushfire they can become pathways that allow a small ember-caused fire to reach the building itself.
This matters because ignition does not always begin in the walls or roof. It can start in a deck corner, a fence line, a pergola beam or another attached element, then spread to the house through direct contact, radiant heat or burning debris. Once the fire reaches the main building, the consequences can escalate quickly.
Risk-reduction options
- Separate combustible structures from the house where practical.
- Replace vulnerable components with more suitable materials where appropriate.
- Reduce places where embers can lodge at the connection point.
- Check for hidden gaps where debris can collect behind or beneath attachments.
Not every existing deck or fence can be replaced immediately, and not every timber feature needs to disappear. But it is important to recognise the role these attachments may play in fire spread. A small, localised ignition can become a house fire if the attachment provides a bridge to the main structure.
When planning upgrades, think about how one part of the property interacts with another. A bushfire-resistant house is not just the main walls and roof. It is also the way all attached structures either help or hinder ember spread.
Windows and doors: keep ember entry in mind
This article does not cover detailed window and door protection, which will be dealt with in Part 5. However, it is still important to note that gaps around windows and doors can allow ember entry. Even when glazing is intact, small openings around frames, thresholds and seals can still matter.
The principle is the same as for other parts of the house: where a gap is unnecessary, remove or seal it. Where an opening must remain, make sure the surrounding detail is suitable for the expected bushfire exposure. Doors and windows should not be treated as isolated items. They are part of the same outer shell that embers are trying to penetrate.
In retrofit work, frames, seals and surrounding wall details should be checked when other upgrades are being planned. A small gap that seems ordinary in mild weather can become a problem when wind-driven embers are present for hours.
Inspection and maintenance: keep the system working
Even a well-designed ember-resistant house still needs inspection. The difference is that inspection should confirm the system is holding together, not compensate for a house that was never designed properly in the first place. A simple homeowner check before every fire season is a practical starting point.
Homeowner ember-vulnerability check
- Inspect roof gaps, ridge lines and roof junctions.
- Check eaves, vents and weepholes.
- Look at roof penetrations, plumbing and electrical entries.
- Review wall junctions and underfloor openings.
- Clear visible debris from ember traps and check access for cleaning.
- Confirm that mesh, seals and barriers are intact and still suitable.
- Review combustible attachments connected to the house.
A periodic professional inspection is also sensible, especially where the house is older, has had major renovations or contains complicated roof and service details. Professionals may spot weaknesses that are hard for a homeowner to see from the ground or from inside the house.
Additional inspection is advisable after roof work, storm damage, renovations or modifications to vents, plumbing, electrical systems or external walls. These are exactly the kinds of changes that can introduce new gaps or disturb previously sound detailing. A house that was reasonably ember resistant before the works may not remain that way afterwards.
Maintenance should also include keeping gutters, valleys and other collection points as clear as possible. Even the best design needs ongoing attention where debris naturally accumulates. The objective is not perfection; it is to keep the vulnerabilities small, known and manageable.
Making ember resistance part of the whole bushfire system
Ember resistance is one layer of the wider Integrated Residential Bushfire Protection System. It works best when combined with defendable space, suitable building construction, water supply, sprinkler systems, passive home hardening and an organised response plan. No single layer should be asked to do all the work.
That said, ember protection has a particularly strong practical value because it targets one of the main ignition pathways. In the proposed readiness model for this series, it carries the highest individual contribution within the overall system. That does not mean ember protection alone ensures survival, and it does not mean other layers are less important in every situation. It simply reflects how significant ember attack can be in real bushfire conditions.
For ordinary homeowners, the central lesson is straightforward. A house that is permanently resistant to ember attack is safer than a house that depends on last-minute action. The ideal is a building that has been designed and retrofitted so the resident is not expected to remember dozens of manual tasks under pressure.
That is why the design priorities in this article matter so much: remove unnecessary gaps, protect the openings that must remain, make roof-space intrusion harder, reduce ember traps, and think carefully about combustible attachments. These measures do not remove all risk, but they reduce the chances that a small ember problem becomes a major house fire.
Ember Resistance Ready Checklist
- Unnecessary roof and wall gaps sealed.
- Roof penetrations properly protected.
- Eaves and roof junctions inspected.
- Required vents protected with suitable non-combustible ember protection.
- Weepholes appropriately protected where required.
- Roof-space vulnerabilities checked.
- Suitable secondary roof barrier considered.
- Roof valleys and ember traps minimised.
- Gutters and debris collection areas accessible for maintenance.
- Combustible structures touching the house reviewed.
- Window and door gaps checked.
- Mesh, seals and protection materials suitable for bushfire exposure.
- Annual homeowner inspection completed.
- Professional review completed when required.
The most practical conclusion is also the most important: stopping embers from getting into the house, roof space and vulnerable junctions may provide greater protection than simply adding more sprinklers to the roof. The strongest ember system is permanent, passive and built into the house from the start. Before publication, verify product suitability, local building requirements and any current bushfire guidance that applies in your area.
FireRescue Training Hub
Access practical fire and emergency study support resources, downloads, checklists, audio guides, and member-only course content.
- Course library
- PDF downloads
- Audio guides
- Checklists
Study support only. Not accredited training or a replacement for workplace procedures.
About the author and safety review
Ken Walker
Former Station Officer and fire service educator
Former career firefighter with extensive career and volunteer fire service experience.
Qualifications: Associate Diploma of Applied Science in Fire Technology; Institute of Fire Engineers studies.
Author profilehttps://www.firerescue.com.au/about-us/