

The Trailsafe Project
When a trailer or caravan (or another similar vehicle) is disconnected from its towing vehicle. The TrailSafe Breakaway System for Caravans is meant to automatically engage the electric brakes. This technology uses the trailer’s house battery to activate the trailer’s electric brake system and lights if there is a trailer breakaway issue.
Manual
 Aside from providing an indicator of the charge level of the house battery. The Trail Safe also inspects the condition of the draw pin. And determines whether or not the brakes are being used effectively. A multi-coloured LED on the TrailSafe unit indicates the presence of this information. When Bluetooth TrailCheck is enabled for in-car monitoring, this information can also be displayed on the device.
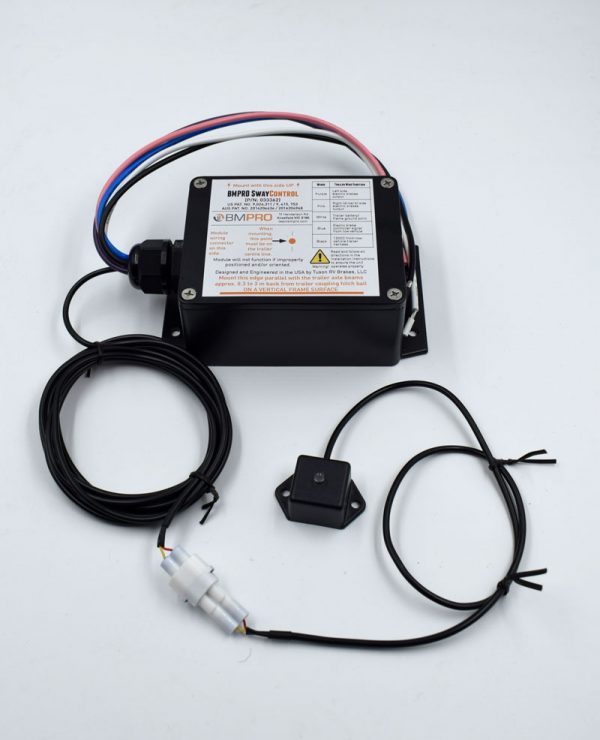 BMPRO’s SwayControl
The mechanical pull pin is forcibly removed whenever the towing vehicle loses contact with the trailer. The brakes and brake lights are engaged as soon as the trailer battery is disconnected or until the pin is replaced, whichever comes first. A total of two models are currently available in the TrailSafe series, namely the TrailSafe and the TrailSafe Plus. BMPRO’s SwayControl may be integrated with the TrailSafe+ thanks to an additional cable included with the device.
Detail Important
In-vehicle displays are available with both Bluetooth and cable communication options. No additional battery is required because it runs on the house battery. The trailer tongue performs a full system safety check, including LED status indicators. As well as battery health, this device tests the functionality of pull pins. In the case of a breakaway, this feature activates both the brake lights and the electric brakes.
The standard for motor vehicles
If disconnected from the towing vehicle, an emergency braking system must be installed on all four wheels and be capable of instantly engaging. A minimum of 15 minutes must elapse between the time the brakes are applied and when they are released. This is required by Australian Design Rule 38/05 for all trailers with a Gross Trailer Mass (GTM) of more than 2000 kilogrammes.
Guide for installation
Location of the mounting
Attach the TrailSafe or TrailSafe+ to the right-hand drawbar of the trailer (on the driver’s side), roughly 300mm from the tow ball hitch, and then tighten the straps. Install the drawbar horizontally on the top or side of the drawbar.
Method of mounting
Attach to the arm of the trailer with the mounting screw that comes with it or something similar. For the device to be able to swivel in an emergency, only one mounting point is required. If the trailer or caravan vibrates loose for some reason, make sure it is securely fastened.
Orientation of Mount
The draw pinpoints in the direction of the tow vehicle. The other end of the pull pin chord is connected to the towing vehicle when using a D-shackle or similar device. Ideally, the wires should be pointing in a direction other than away from the tow vehicle. If the car and trailer separate, the draw pin will be able to be easily removed.
Instruction for disconnection
The TrailSafe and TrailSafe+ have various coloured wires coming from the rear that must be connected for the device to function correctly. An adequately experienced Auto Electrician should complete all wiring on this safety-critical system. Due to the high level of risk involved. If you plan to use the TrailSafe, connect it to the house batteries, trailer brakes, and brake lights before driving.
Refer to the TrailSafe Wiring Diagram for more information.
Click For Manual
If you’re utilising the TrailSafe+ in conjunction with BMPRO’s SwayControl, connect the TrailSafe+ to the house batteries, trailer brakes, and brake lights. Refer to the TrailSafe+ with SwayControl Wiring Diagram for further information.
A single negative output connection on BatteryPlus35 or J35, if applicable, must be connected directly to the return (negative) wires of the trailer’s brakes and brake lights. The non-battery side of a negative side shunt, such as the BC300, is where this is applied.
In all other circumstances, connect directly to the battery’s negative terminal. Ascertain that the house battery is adequately charged with an appropriate charging source, such as a BatteryPlus35, J35, or other charging means. It is in proper working order.
Consult the manufacturer’s instructions for further information. A rudimentary charging mechanism such as a diode connecting the Auxiliary battery to the house battery can be used in simple systems. Installing an external automotive-grade fuse (30A maximum) between the TrailSafe / TrailSafe+ and the battery is necessary to safeguard against wiring failures and difficulties.
Self-assessment at the outset
Before you begin, double-check that the TrailSafe or TrailSafe+ pull pin is securely in place.
Connect the TrailSafe or TrailSafe+ to your 12V battery and turn it on according to the wiring instructions. In this case, the LED will show a constant flashing PURPLE, indicating that the first calibration stage is now underway. This will last for a maximum of five minutes.
As soon as the first stage is completed, the LED will show a solid PURPLE colour on the screen. When this occurs, pull the safety pin out of the hole. A constant flashing PURPLE light will appear on the LED once more, indicating that the second calibration stage is now taking place. This will last for a maximum of one minute.
![]() If the LED flashes alternately PURPLE and RED, the wiring voltage drop in the black/red wire (+v) and/or the white wire (-v) is greater than 10% of the nominal voltage. Examine the electrical connections and consider increasing the size of the black/red and/or white wires, if necessary.
If the LED flashes alternately PURPLE and RED, the wiring voltage drop in the black/red wire (+v) and/or the white wire (-v) is greater than 10% of the nominal voltage. Examine the electrical connections and consider increasing the size of the black/red and/or white wires, if necessary.
Once the project is completed, the LED will display a solid PURPLE colour. Place the draw pin back into the hole at this point. After that, the LED will display a status indicator. For more information, see the section on LED Status Indicators.
 Without the SwayControl, Trailsafe operational use is possible.
Depending on how much charge is left in the battery after the TrailSafe has finished calibrating and is ready for operational usage, the LED’s colour will change to indicate how much charge is left.
NOTE: If you want to use the TrailSafe+ in conjunction with BMPRO’s SwayControl, please see the TrailSafe with SwayControl section of the handbook for further information.
The battery is completely depleted.
Even if other LED signalling states are engaged simultaneously, if the battery is completely depleted, the LED would remain illuminated at a steady RED. The fault indications are the only indication states that will not be overridden by the system.
In-vehicle monitor
If an in-car monitor is utilised, it must be placed in a location where it is visible to the driver while driving. To learn more about the Wireless Monitor TrailCheck, consult the user handbook.
Servicing
TrailSafe (or TrailSafe+) should not be serviced or repaired by the user. The user should not dismantle, modify, or repair the TrailSafe (TrailSafe+). Not doing so will void your warranty. If you have any questions about your TrailSafe product, please contact your local BMPRO dealer or visit teambmpro.com for further information.
 FAQ & Troubleshooting
When I pull the pin, the TrailSafe indication does not come on. Why is this happening?
Check the fuse that was provided on the black/red wire. Verify that the wiring corresponds to the diagram. Make sure that the TrailSafe or TrailSafe+ pin slot is free of dirt. Check to see that the house battery is fully charged.
What are the benefits of testing TrailSafe before attaching it to the tow vehicle?
Testing the TrailSafe or TrailSafe+ guarantees that the home battery has adequate capacity to operate the brakes. Being for 15 minutes or more in the event of a failure of the trail safety system.
When it comes to TrailSafe, what is the difference between solid green, orange, and red status indicators?
The colour GREEN – indicates that the battery has been detected and that it’s fully charged. Indicating there is no fault. You’re ready to go!
ORANGE – indicates that a secondary check is required because the battery level may be too low.
The colour RED – indicates that the battery has not been detected or does not have adequate capacity to operate the emergency brake for 15 minutes.
Other info
It is possible that the battery is sufficient but fails to provide a precise pass. While using multiple axle brakes, heavy brake light loads, warm batteries, a significant weight on the trailer, etc. It is required that there be at least 10Ah of functional battery capacity remaining, which may necessitate the usage of 20% of an ageing 100Ah-rated battery for this load.
If there are any loads (e.g., lights, 12V refrigerators) running in the trailer, turn them off as soon as feasible. It should be possible to tell whether there is enough battery capacity left for the emergency braking function. If your trailer (caravan) has a display that shows the remaining battery capacity; otherwise, you will have to guess.
Is it possible to use a wired in-car monitor?
If required, a wired 12VDC battery voltage indicator can be utilised in conjunction with the TrailSafe or (TrailSafe+).
When I pull the pin, the LED display flashes RED and ORANGE. What is going on?
Depending on the situation, a malfunctioning pull pin may cause the brakes to not operate correctly or for as long as needed.
The TrailSafe displays a RED LED, despite my house battery being fully charged.
The internal resistance of the house battery can cause the house battery terminal voltage to drop below the minimum. The TrailSafe threshold is if a heavy load is connected to the house battery, such as a refrigerator. This is due to the internal resistance of the house battery. Turn off any auxiliary equipment and re-test.
I was under the impression that removing the pin was not an intelligent idea.
This is an essential feature of the device. Removing the pin to test the unit can determine whether or not the switch is operational. It also determines whether or not the battery is ready to perform in an emergency.
Do you want to know why the LED is constantly flashing RED?
The battery should be recharged or replaced. The battery voltage is extremely low, deemed flat by most experts. For more information, go to the part of the manual titled LED Status Indicators.
Precautions for safety
![]() Ensuring you follow the safety precautions is essential. Property damage or personal injury may come from failure to follow these directions correctly. Depending on the circumstances, this damage or injury can even be substantial enough to cause the loss of life.
Ensuring you follow the safety precautions is essential. Property damage or personal injury may come from failure to follow these directions correctly. Depending on the circumstances, this damage or injury can even be substantial enough to cause the loss of life.
Execute a trial operation after completing the installation of the TrailSafe or TrailSafe+ to identify any problems with the system. For information on conducting an initial self-test, refer to the Initiation Self-Test section of this manual.
Terms and conditions of the warranty.
The registration of your BMPRO product is a vital step in ensuring that you obtain the benefits to which you are entitled. Please go to teambmpro.com to complete the online registration form for your new product as soon as possible.
Warnings
The correct installation of the TrailSafe is the most essential component in assuring its safe use in the field. The TrailSafe will be safe to operate if all of the requirements in these instructions have been met.
Before wiring or servicing TrailSafe, make sure it is completely disconnected from all power sources. It should be inspected before using the pull pin to ensure that the switch works well and the battery is good.
![]() The TrailSafe is an electrical gadget with extremely high precision. It does not have any user-serviceable components on the inside. Do not attempt to disassemble, modify, or repair it on your own. Don’t void the product warranty by disassembling it. Have it serviced or repaired by an authorised person.
The TrailSafe is an electrical gadget with extremely high precision. It does not have any user-serviceable components on the inside. Do not attempt to disassemble, modify, or repair it on your own. Don’t void the product warranty by disassembling it. Have it serviced or repaired by an authorised person.
Other warnings
- It is critical that you keep the battery in good condition, and has at least 50% of its nominal capacity accessible at all times.
- It is critical that all wiring be secured by a breaker located close to any power source.
- When using a LiFePO4 battery, it is necessary to connect the green wire to the battery’s positive terminal. Failing to do this may result in reported incorrect battery capacity information.
- Failure to properly install the fuse may result in permanent and severe failure or damage. This would be to the trail safe and/or its wiring if the fuse is not installed correctly.
- If the TrailSafe+ blue wire is connected directly to the trailer brakes and the SwayControl is also fitted, the connection should be avoided. If this is not done, the unit’s ability to manage sway is entirely disabled.
- All negatives must travel via the BP35/J35 before connecting to the house battery if you have a BP35/J35 installation.
- All negatives must be routed through the BP35/J35 and then BC300. Before they can be connected to the house battery, if you have a BC300 installed.